JM-550 Drum Machine: AWT sliders
This series of classes introduces a simple, but extendible, drum machine
program.
There are a series of jm-550 tutorials (influenced by the drum patterns
of the Boss DR-550 drum machine) which show the development
of a Java graphical user interface for a jMusic application.
The first tutorial looked at the application
without any GUI code, in the second tutorial
some simple start and stop buttons were displayed in a window frame, in
this tutorial sliders are added to control tempo and volume, and in the
next tutorial a list of drum patterns is added. So here goes...
This tutorial introduces the AWT (Abstract Windowing Toolkit) sliders (called ScrollBars) and AWT Labels.
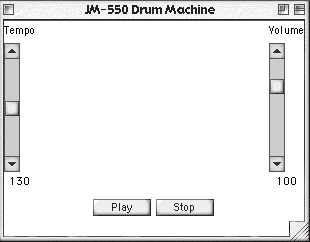
Here is the GUI generated by this program:

There are three two other classes required for this tutorial,
the Basic_550 and EightBeat1 classes
(download and compile if you don't already have them from a previous
tutorial).
This tutorial concerns the class JM_550c
Click here to view the source.
Lets have a closer look.
import jm.JMC; |
In order to use the awt classes we need to import two packages- java.awt.*;
and java.awt.event.*;
The awt package has the classes for windows buttons and so on, and the
awt.event package has classes for handling mouse clicks on the buttons,
movement of the sliders, and so on.
public class JM550c extends Frame implements JMC, ActionListener, AdjustmentListener { |
The class declaration and main method are the same as in the previous
JM-550 class.
The addition is the implementation of the AdjustmentListener interface.
The scrollbars use a different listener to the buttons, but logic is the
same.
Register the object with the listener interface and provide the required
method to deal with the user actions.
Here's the explanation from the previous tutorial - skip it if you like.
In the class declaration there are two important things to notice regarding the awt GUI. Firstly, the class extends the Frame class (java.awt.Frame) which allows this class to be a window. Secondly, it implements the ActionListener (java.awt.event.ActionListener) to capture and handle user interaction with the GUI.
After declaring the class two class variables are declared - two buttons which will be used to start and stop playback.
The main() method calls the constructor which draws the GUI (more about that below), then creates an instance of the EightBeat1 class which creates a drum pattern, and thirdly the playback() method (which EightBeat1 inherited from Basic_550) is invoked, which does the obvious thing - hopefully starts playing the drum pattern over and over!
public JM550c() {
|
In the constructor all the GUI setup work is done. In this class there's quite a bit of it so we'll deal with it in three bits.
The first bit, above, is very much like what we had in the previous example.
We create a Panel and add two buttons to it, registering each button with
the ActionListener.
Because our layout is a bit more complex this time, we add components
to different areas of our frame.
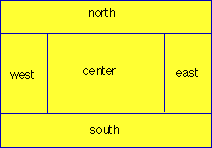
This requires a bit of explanation - so here goes. The frame can have
different layout arrangements, in Java called 'Layout Managers'.
The default one in an awt frame is called the 'border layout' which has
five areas, one on each border and one in the middle, as below.

So we add the start and stop buttons to the bottom area with the following code:
this.add(transport, "South");
// Tempo panel Panel tempoPanel = new Panel(); tempoPanel.setLayout(new BorderLayout()); Label tempoLabel = new Label("Tempo", Label.CENTER); tempoPanel.add(tempoLabel, "North"); // Scrollbar arguments - orientation, initial value, visuble amount, min, max tempoSlider = new Scrollbar(Scrollbar.VERTICAL, 250 - 130, 20, 0, 250); tempoSlider.addAdjustmentListener(this); tempoPanel.add("Center", tempoSlider); tempoValue = new Label("130", Label.CENTER); tempoPanel.add(tempoValue, "South"); this.add(tempoPanel, "West"); |
We will look at the creation of the tempo slider and its labels now. All these are on a panel which is added to the west area of the frame.
There are three components involved - the tempoLabel, tempoSlider, and
tempoValue.
These are all added to the tempPanel, which itself is set to a borderLayout.
The first two lines of this section create the tempoPanel and establish
it as having a border layout.
The next two lines of code create a new label object called tempoLabel
which will display the word "Tempo" above the slider.
It is added to the tempoPanel in the north (top) area.
Next the slider is added. the tempoSlider is a ScrollBar object which is vertically aligned, has an initial value of 130 with an indicator 20 pixels wide, a minimum value of zero and a maximum of 250. The odd thing about the scroll bar values is that 0 is at the top, so for 'normal' operation we have to subtract ever value from the maximum. (This is one of many things 'fixed' in Swing.) It is registered with the AdjustmentListener worse method for responding to adjustments is in this class. It is added to the center [sic. American spelling] area of the tempoPanel.
Thirdly, the tempoValue Label is created and set to an initial value of 130 and centre justified. This object will display the value of the slider and we will update it in response to slider movements. It is added to the bottom section of the tempoPanel.
Finally the whole tempoPanel is added to the left area of the frame.
// volume slider |
The volume slider and labels follow a similar logic to that of tempo - so we won't repeat it all. In brief, the volume panel is created and set to have a border layout, the volume label is created and added to the top of the volume panel, the scroll bar is created and added to the centre, the volume value readout is created and added to the bottom of the panel, lastly the volume panel is added in total to the right (east) side of the frame. Remember THIS class IS the frame object.
Lastly, the frame is made visible. Notice, that we do not pack this time. We don't want the scrollBars to be 'as small as possible' because that is stupidly small! Try it for fun :)
// deal with button clicks public void actionPerformed(ActionEvent ae) { if (ae.getSource() == start) |
The button clicks are handled here exactly as for the last tute. Here's the text again as a reminder:
To deal with clicks on the start and stop button we add functionality to the actionperformed() method. This method must be used whenever we implement the ActionListener interface.
The method is called automatically each time a user clicks on a button registered to the ActionListener - which our two buttons are.
When called we check to see which button was clicked and make appropriate calls our pat (which is an instance of EightBeat1, which in turn is an extension of Basic_550). These buttons do the obvious thing: start and stop the drum loop from playing. Note that to avoid multiple streams of play, when the play button is clicked the Play class is checked to make sure nothing is already playing. If nothing is playing, the the playback method will be invoked.
// deal with slider movements public void adjustmentValueChanged(AdjustmentEvent ae) { // tempo if (ae.getSource() == tempoSlider) { int value = 250 - tempoSlider.getValue(); tempoValue.setText(Integer.toString(value)); pat.setTempo(value); } // volume if (ae.getSource() == volumeSlider) { int value = 12 * (10- volumeSlider.getValue()); volumeValue.setText(Integer.toString(value)); pat.setScoreVolume(value); pat.changeDynamics(); } } } |
The procedure for handling the scrollBar movements is similar to handling
the button clicks.
The AdjustmentListener, in this case, catches the movements and calls
the adjustmentValueChanged() method that we've implemented and is shown
above. It passes the user action as an AdjustmentEvent object to the method.
We first look for the source of the object. i.e. Which scrollBar generated the movement? In each case we get the new value of the scrollBar and invert it around the maximum value to compensate for the fact that zero is at the top rather than the bottom. We then set the 'title' of the volumeValue or tempoValue object to display the new value in our GUI. Next the appropriate action is taken. In the case of the tempo the super class's setTempo() method is invoked, so that the Score object's tempo is adjusted. In the case of the volume, the super class's volume level argument is updated and the changeDynamics() method is invoked so that the score dynamics are changed ready for the next time the score is played.
Have a go at compiling and running this class, then have a break - You
deserve it! There is quite a bit to take in here.
It might be wise to read a Java book or web site that introduces the AWT
classes to round out your understanding (and my explanation).
Move on to the next tutorial which fills the
hole in the middle of the GUI by adding a list of the available drum patterns
from which to select on on the fly:
JM-550 Drum Machine: AWT List
