|
import jm.JMC;
|
In order to use the AWT classes we need to import two packages: java.awt.*; and java.awt.event.*; The awt package has the classes for windows buttons and so on, and the awt.event package has classes for handling mouse clicks on the buttons, movement of the sliders, and so on.
public class JM550d extends Frame implements JMC, |
The new addition to the class declaration is the implementation of the ItemListener interface. This is the listener used by the awt List class. You should now see the pattern of connection between GUI interface components and listener interfaces. It is that different GUI components that can respond to user actions (using mouse, keyboard, etc.) have associated listener interfaces that handle actions upon them. For example, Buttons use the ActionListener, ScrollBars use the AdjustmentListener, and Lists use the ItemListener. To use a listener interface your class implements it in the class declaration and you provide the associated method - in the case of the ItemListener this is the itemStateChanged() method - see below.
The main method here is identical to previous incarnations of the JM550 class.
public JM550d() { |
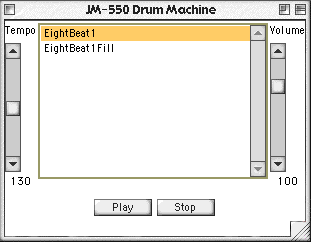
In the constructor all the GUI components are added. As these tutorials have proceeded we have more and more code relating to the GUI. Above is the code so far, repeated for your convenience, and below is the new code for the List. As you can see writing the GUI can be more complex, time consuming and code dense than the actual workings of the jMusic composition.
// pattern list patterns = new List(5); // how many visible rows patterns.addItemListener(this); patterns.add("EightBeat1"); patterns.add("EightBeat1Fill"); patterns.select(0); this.add(patterns, "Center"); //this.pack(); this.setVisible(true); } |
Adding the List component follows similar steps to the other GUI components. First we declare a new List instance called patterns. We register it with the ItemListener using its addItemListener() method. The word 'this' passed to that method indicates that the place to look for the associated itemStateChanged() method is in 'this' class.
We then add two items to the list, these are simply Strings (text names) with which we will later associate the pattern instances. These Strings will appear in out list - they should be human readable and have sensible names. Next we tell the List instance to start out with the zeroith item in the list selected.
The List is added to the frame in the centre area of its border layout.
Finally, the frame is made visible.
// deal with button clicks public void actionPerformed(ActionEvent ae) { if (ae.getSource() == start) player.resumePlayback(); if (ae.getSource() == stop) player.suspendPlayback(); } // deal with slider movements public void adjustmentValueChanged(AdjustmentEvent ae) { // tempo if (ae.getSource() == tempoSlider) { int value = 250 - tempoSlider.getValue(); tempoValue.setText(Integer.toString(value)); pat.setTempo(value); } // volume if (ae.getSource() == volumeSlider) { int value = 12 * (10 - volumeSlider.getValue()); volumeValue.setText(Integer.toString(value)); pat.setScoreVolume(value); pat.changeDynamics(); } } |
The methods for handling the button clicks and scroll bar movements are shown above - details about these is covered in previous tutorials.
// deal with list selections public void itemStateChanged(ItemEvent ie) { if (ie.getSource() == patterns) { int selected = patterns.getSelectedIndex(); if (selected == 0) pat = new EightBeat1(); if (selected == 1) pat = new EightBeat1FillIn(); } } } |
The itemStateChanged() method is called each time the user selects and item in the list. When this occurs the listener passes an ItemEvent object containing all the details of the action to this method. We first check to see that the message is from the patterns List (of course there is no other list in this class but we're being thorough). If so, an integer variable called 'selected' is declared and given the number of the selected list item (0, 1, 2, 3, ...). We have only two items currently so the value will be 0, 1, or -1 if no item is selected.
We handle each case separately. If the value is 0 then the first item was selected, the EightBeat1 pattern, and so we set our classes current pattern, pat, to a new instance of the EightBeat1 class. Similarly if the list index is 1 we change to a new EightBeat1FillIn object. Since this is the same reference the Play class is holding, the next time it goes to play a bar (or measure) the new pattern will be heard.
You might try making new drum pattern classes and adding them to the list.
|
|
|
|
|
|
|
|
