Graphical User Interface - Stage 4
This fourth stage of the GUI development on top of
jMusic utilises dialog saving routines from the native OS and enables
scores to be viewed with the jMusic ShowScore tool. This creates an
environment which, apart from composing the scores, makes a quite
productive working context where parameters can be changed, results
seen, and files saved when a worthwhile 'take' arises.
You may even want to make use of the command:
Play.midi(score), so that you can hear your compositions immediately.
Click
here to view source.
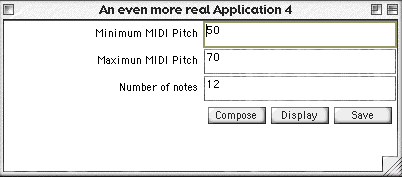
The GUI will look similar to this:
Let's have a closer look.
import java.awt.*;
import java.awt.event.*;
import jm.JMC;
import jm.music.data.*;
import jm.util.*;
import jm.music.tools.*;
public class SimpleGUI4 extends Frame implements ActionListener, WindowListener, JMC{ TextField minPitch;
TextField maxPitch;
TextField numOfNotes;
FileDialog fd;
Score s = new Score("JMDemo - SimpleGUI_4");
Button composeBtn, showBtn, saveBtn;
public static void main(String[] args) {
new SimpleGUI4();
}
public SimpleGUI4() {
super("An even more real Application 4");
this.addWindowListener(this);
this.setLayout(new GridLayout(5, 2, 5, 0));
Label minPL = new Label("Minimum MIDI Pitch", Label.RIGHT);
this.add(minPL);
minPitch = new TextField("50");
this.add(minPitch);
Label maxPL = new Label("Maximun MIDI Pitch", Label.RIGHT);
this.add(maxPL);
maxPitch = new TextField("70");
this.add(maxPitch);
Label numNL = new Label("Number of notes", Label.RIGHT);
this.add(numNL);
numOfNotes = new TextField("12");
this.add(numOfNotes);
Label dummy = new Label("", Label.RIGHT);
this.add(dummy);
Panel p = new Panel();
composeBtn = new Button("Compose");
composeBtn.addActionListener(this);
composeBtn.setActionCommand("Create");
p.add(composeBtn);
showBtn = new Button("Display");
showBtn.addActionListener(this);
showBtn.setActionCommand("Display");
p.add(showBtn);
saveBtn = new Button("Save");
saveBtn.addActionListener(this);
saveBtn.setActionCommand("Save");
p.add(saveBtn);
this.add(p);
this.pack();
this.show();
}
public void windowClosing(WindowEvent we) {
System.exit(0);
}
public void windowActivated(WindowEvent we) {};
public void windowClosed(WindowEvent we) {};
public void windowDeactivated(WindowEvent we) {};
public void windowIconified(WindowEvent we) {};
public void windowDeiconified(WindowEvent we) {};
public void windowOpened(WindowEvent we) {};
public void actionPerformed(ActionEvent ae) {
if (ae.getSource() == composeBtn) {
makeMusic(Integer.valueOf(minPitch.getText()).intValue(),
Integer.valueOf(maxPitch.getText()).intValue(),
Integer.valueOf(numOfNotes.getText()).intValue());
}
if (ae.getSource() == saveBtn) {
fd = new FileDialog(this, "Save jMusic MIDI file as...",
FileDialog.SAVE);
fd.show();
if (fd.getFile() != null) {
Write.midi(s, fd.getDirectory()+fd.getFile());
}
if (ae.getSource() == showBtn) {
View.show(s,10,170);
}
}
public void makeMusic(int minPitchVal, int maxPitchVal, int numOfNotesVal) {
s.empty();
Part p = new Part("Piano", 1, 0);
Phrase phr = new Phrase(0.0);
for(short i=0;i<numOfNotesVal;i++){
Note n = new Note((int)((Math.random()*
Math.abs(maxPitchVal-minPitchVal))+
minPitchVal), C);
phr.addNote(n);
}
p.addPhrase(phr);
s.addPart(p);
Toolkit.getDefaultToolkit().beep();
}
}
|
To be continued... There is nothing new in this
class from earliuer GUI tutorials, it's just all in one place which
makes it look long. Take your time and work through the code slowly to
see what's going on.
Importantly notice that the actionPerformed method
handles events generated by all of the three buttons. First it checks
which button was the source of the event, then proceeds appropriatly.
|
