Graphical User Interface - Stage 3

This third stage adds three new aspects to the GUI.

1) It introduces the GridLayout which organises the arrangement of components in the frame.

2) It adds more Text Fields so that variables in the music composition algorithms can be varied at each run. These also require text labels to name the fields and some conversion from the text field to variable integers.

3) We finally make the close box work. Such that it closes the window and shuts down the program.

Click here to view source.

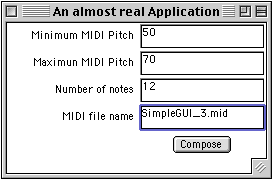
This is what the GUI will look similar to this.

Let's have a closer look.

import java.awt.*;
import java.awt.event.*;
import jm.JMC;
import jm.music.data.*;
import jm.util.*;
We import the usual suspects including the awt and awt.event classes for the GUI.

public class SimpleGUI3 extends Frame implements ActionListener, WindowListener, JMC{	
//--------------
// Attributes shared within the class
//--------------

TextField fileNameBox;
TextField minPitch;
TextField maxPitch;
TextField numOfNotes;
Button composeBtn;
//--------------
// simple main method called when the class in run
//--------------

public static void main(String[] args) {
new SimpleGUI3();
}
The class definition implements three things, the ActionListener and WindowListener which monitor user actions, and the JMC for the jMusic constants.

This GUI has four TextFields which are next declared.

The main() method is a simple call to the constructor.

	// constructor	
public SimpleGUI3() {
//give the window a name
super("An almost real Application");
//register the closebox event
this.addWindowListener(this);
// change the colour of the frame background
this.setBackground(Color.green);

//set the layout for the Frame
this.setLayout(new GridLayout(5, 2, 5, 0));

//add the components
Label minPL = new Label("Minimum MIDI Pitch", Label.RIGHT);
this.add(minPL);

minPitch = new TextField("50");
minPitch.setBackground(Color.lightGray);
this.add(minPitch);


The first part of the constructor (which does most of the work in this class) calls the Frame class (super class) with the window title, the frame is registered with the windowListener and its background colour set to green.

The Frame employs the GridLayout which arranges areas in the frame into equal sized rectangles. The arguments are number-of-rows, number-of-collumns, horizontal-gap-between-cells, vertical-gap-between-cells.

The first label and text field are next added to the frame.

             	Label maxPL = new Label("Maximum MIDI Pitch", Label.RIGHT);
this.add(maxPL);

maxPitch = new TextField("70");
maxPitch.setBackground(Color.lightGray);
this.add(maxPitch);

Label numNL = new Label("Number of notes", Label.RIGHT);
this.add(numNL);

numOfNotes = new TextField("12");
numOfNotes.setBackground(Color.lightGray);
this.add(numOfNotes);

Label fNameLable = new Label("MIDI file name", Label.RIGHT);
this.add(fNameLable);

fileNameBox = new TextField("SimpleGUI_3.mid");
fileNameBox.setBackground(Color.lightGray);
this.add(fileNameBox);

Label dummy = new Label("", Label.RIGHT);
this.add(dummy);

//create a panel to put the button on
// so it doesn't fill the grid space

Panel p = new Panel();

//add the button
composeBtn = new Button("Compose");
composeBtn.addActionListener(this);
composeBtn.setActionCommand("Create");
p.add(composeBtn);

//put the panel in the frame
this.add(p);

//display the window
this.pack();
this.show();
}


The second part of the constructor continues to add elements to the frame as we have seen in earlier GUI tutorials.

The button is this time put on to a panel. Doing this stops the button occupying the entire space of the cell in the frame. On a panel the button is more well behaved, its size is determined by the button label and OS look and feel. A panel called 'p' is created, the button is declared and added to the panel, then the panel is added to the frame layout.

	// Deal with the window closebox	
public void windowClosing(WindowEvent we) {
System.exit(0);
}

//other WindowListener interface methods
//They do nothing but are required to be present

public void windowActivated(WindowEvent we) {};
public void windowClosed(WindowEvent we) {};
public void windowDeactivated(WindowEvent we) {};
public void windowIconified(WindowEvent we) {};
public void windowDeiconified(WindowEvent we) {};
public void windowOpened(WindowEvent we) {};


Here the user events 'seen' by the WindowListener interface are dealt with. The only one we are concerned with is the WindowClosing event which is generated when the window's close box is clicked. When this happens the Java application is simply told to quit with the command System.exit(0). When implementing an interface all the methods of the interface must be overridden, and that is why we have all the other window method stubs - that is they consist only of {} and so do nothing. It would be easy now to add code to deal with each of these events. it also gives you a good idea of the kinds of window events that can be caught.

	// Deal with the button click	
public void actionPerformed(ActionEvent ae) {
if (ae.getSource() == composeBtn) {
String fn = fileNameBox.getText();
if (fn != null) {
makeMusic(fn,
Integer.valueOf(
minPitch.getText()).intValue(),
Integer.valueOf(
maxPitch.getText()).intValue(),
Integer.valueOf(
numOfNotes.getText()).intValue());
} else makeMusic("SimpleGUI_3.mid",
Integer.valueOf(
minPitch.getText()).intValue(),
Integer.valueOf(
maxPitch.getText()).intValue(),
Integer.valueOf(
numOfNotes.getText()).intValue());
}
}

This method deals with the button click. It check to see if there is a name of the MIDI file in the TextField, if so it gets all values and passes them to the makeMusic() method. If not, it gets other values and passes a default file name to the makeMusic() method.

Notice that to get the numerical values from the TextFields they must be converted from strings to integers with code similar to:

Integer.valueOf(minPitch.getText()).intValue()

Where minPitch is the name of the TextField. Complicated I admit, but . . . just copy it and use it.


	public void makeMusic(String fileName, int minPitchVal, int maxPitchVal, 
int numOfNotesVal) {
Score scale = new Score("JMDemo - SimpleGUI_3");
Part inst = new Part("Music", ATMOSPHERE, 0);
Phrase phr = new Phrase(0.0);

for(short i=0;i<numOfNotesVal;i++){
Note note = new Note((int)((Math.random()*
Math.abs(maxPitchVal-
minPitchVal))+
minPitchVal),
SQ,
(int)(Math.random() * 80 +
40));
phr.addNote(note);

}
inst.addPhrase(phr);
scale.addPart(inst);

//write a MIDI file to disk
Write.midi(scale, fileName)
}
}

This is the code which generates the jMusic score. It simply generates a stochastic melody with stochastic dynamics.